How to clear the cache on the Google Nexus 5


When you first get it, the Google Nexus 5 is a lean, mean Android machine just like Google intended it. But over time and endless app installs and updates, it’s likely to develop a few performance issues. You might find that apps tend to crash, or that the system starts to feel slower than you’d like. The good news is that the solution is often very simple. As we’ll discover, clearing the cache on the Nexus 5 can solve shenanigans and terminate tomfoolery.

What the cache is, and what clearing it does
In the natural world a cache is where an animal stores food for later, such as when a squirrel hides the nuts it’s collected. In computing, it’s where a device temporarily stores its data. On your Nexus and in Android in general there are two kinds of cache: there’s an app cache, and there’s a system cache. The app cache is a place where Android stores temporary data for each app, and the system cache is where Android stores temporary data used by Android itself. Most of the time everything works brilliantly, but if something goes wrong with the cache - such as it gets corrupted or just full up - then that can cause issues with your Nexus.
How to clear the app cache on the Google Nexus 5
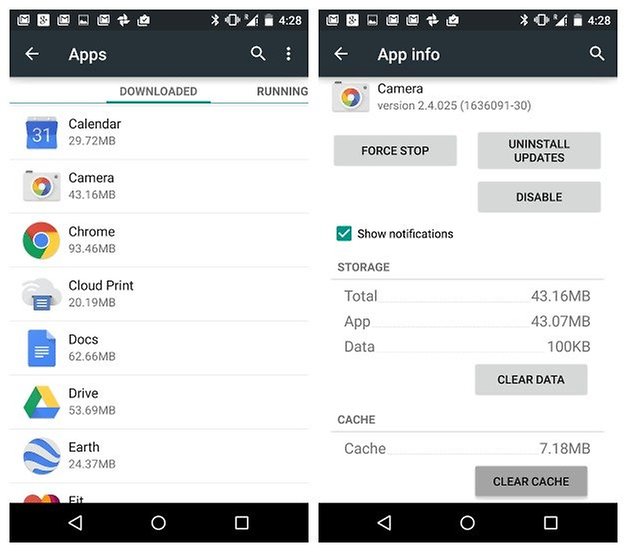
To decide whether you need to clear the system cache or the app cache, you need to identify whether the problem occurs with a single app every time. If it does, the app cache for that app should be your first port of call.
To clear it:
- Go to Settings > Device > Apps > All.
- Tap on the name of the app whose cache you want to delete.
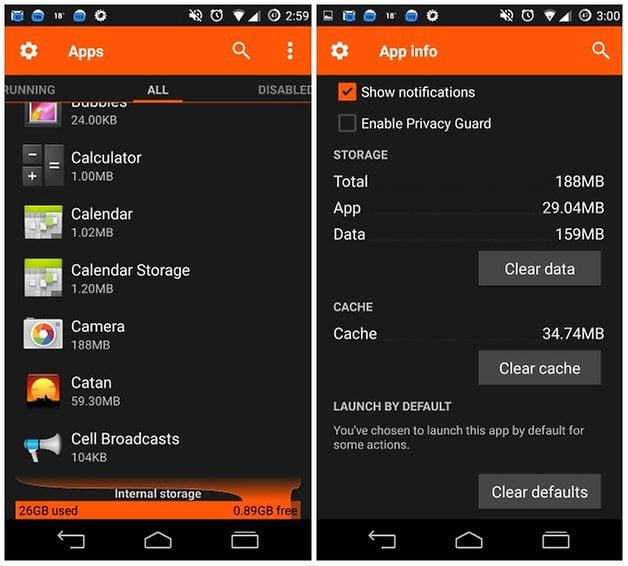
You should now see a screen with lots of options and information. The bit we’re looking for is the button that says Clear Cache, which will appear if that app uses a cache. Make sure you tap the Clear Cache button and not the one that says Clear Data, because that - as you’d expect - clears all of the data for that application, such as user names, passwords, game progress and so on.
What to do when cache clearing doesn’t fix your app
Clearing the app cache doesn’t always do the trick. If your problem appears to be app-specific the next step is to try something Windows users are very familiar with: uninstalling the app, rebooting the device and reinstalling it again. It’s worth noting that uninstalling will probably remove any personal data and/or saved files, so make sure you’ve got a backup of anything you want to keep.

How to clear the system cache on the Google Nexus 5
Sometimes your problem can’t be pinned on a single app. That could mean that the system cache needs clearing out, and you can clear the cache on the Nexus 5 very easily. All you need to do is to go into Settings > Storage > Cache and clear the system cache.
What to do if clearing the app cache and system cache don’t work
Throw it under a bus while screaming “I will get you for this, Google! I will make you pay!” No! We’re kidding! If clearing both kinds of cache hasn’t solved your problem, then clearly the cache wasn’t the culprit. Not to worry: make sure you’ve got a backup of anything important, which of course we’re sure you’ve done already, and then hit your Nexus with a full-on factory refresh. This is the nuclear option, because it restores your Nexus to factory fresh condition - that is, without any of the settings or data you’ve added.
Got a backup? Excellent. Follow these steps:
- Go into Settings and tap on Backup and Reset
- Untick Back Up My Data, assuming you do actually have a backup
- Tap Factory Data Reset
- Enter your PIN or password if asked to. Tap Continue.
- Tap on Delete All.
- Wait a bit.
If that hasn’t worked, there’s an even more nuclear option: the hard reset. This is another full erase, but this time it includes anything on your internal SD card too. It won’t wipe out any Android updates you’ve installed, but it gets rid of absolutely everything else. To do that:
- From a powered off state, press the Power button to start your Nexus 5. When you see the Google logo press and hold the Volume Down key and release when the device vibrates.
- Use the volume keys to highlight Recovery Menu and press the Power button to select. This will bring you to a screen with an Android on its back.
- Hold the Volume Up key for 5 secs then release and a new menu will appear.
- First off, you can use the volume keys to select Wipe Cache Partition. This will cause your phone to restart. once this is done, re-do the previous steps to get back to the same screen (the one that Wipe Cache Partition was on).
- Highlight Wipe Data/Factory Reset and select using the Power key. Scroll down to Yes, Delete All Data and press the Power button again to select.
- Your Nexus 5 will now wipe your data and reformat.
- On the next screen hit the Power button to select Reboot System Now.
What about you? Have you found cache clearing to fix 99% of all known problems, or have app issues on your Nexus driven you to despair? Share your success stories or knackered-Nexus stories in the comments!







Trying to access the "Wipe Cache" menu in Recovery Mode did NOT work for my Nexus 5.
Power Off/Power On+Vol. Down/Recovery Mode/"No command"... Vol. Up x 5 seconds... nothing happens.
Thanks for the tips. I found that I could only get to the wipe cache partition option by holding down the power button and just tapping once on volume up. This is after you have held power and volume down to get and navigated to recovery mode.
As we all know, by cleaning up unwanted files from Google Nexus 5, more free space will be saved.
With more space freed up on your Google Nexus 5, the faster your Android phone will run.