Buying guide: Find the best PV module for your balcony power plant
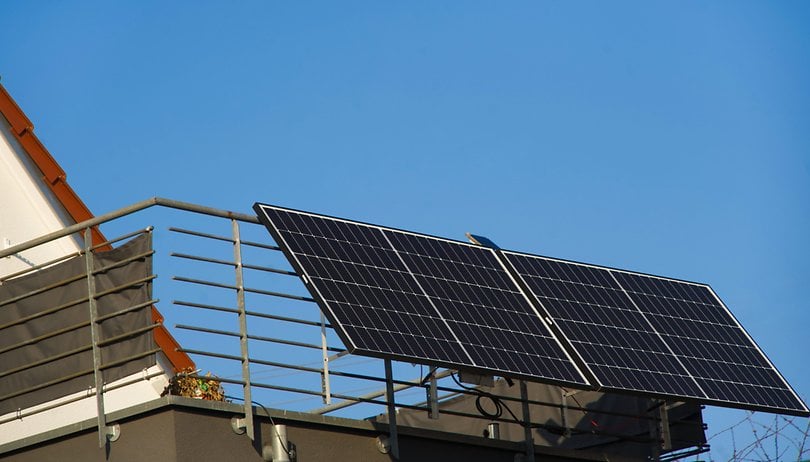

Which PV module is right for my balcony power plant? Looking into a solar panel store can be quite overwhelming at first. You will be bombarded with data sheets full of information on short-circuit voltage, temperature coefficients, etc.—but don't worry: In this article, we will guide you through all the technical data that is really important when buying a solar panel.
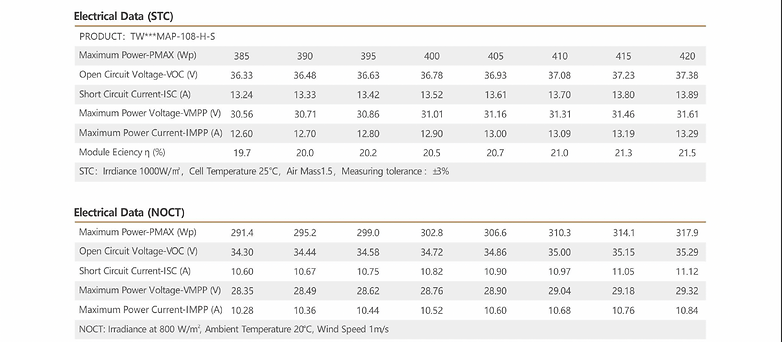
We'll take a look at the technical data sheet of Trina's 420 W panel as an example, which you can download here.
Table of Contents
- Buying advice: What to look out for in PV modules
- Current and voltage in a solar panel array
- Good to know: Product Warranty vs. Performance Warranty
- Q&A
Buying advice: What to look out for in PV modules
What's the difference between watts and watt-peak? What about short-circuit voltage and why is it so important? We explain both and much more in this section that covers the basics of PV modules.
Solar panel basics
Power: Watt-peak (Wp) and Watt (W)
For your solar panel's power, we will first have to distinguish between Watt-peak and Watt. Watt-peak refers to the theoretical maximum power of your panel under optimal light irradiation and typically within the 20 to 25 degrees Celsius range. In case of shade or unfavorable sun angles, the power will decrease accordingly.
On the other hand, when it comes to watts, you typically measure the current output power of your PV module. The output power tells you how much energy your PV module currently generates and sends to the inverter.
Voltage, open circuit voltage, and others: Volt (V)
Volt is the unit for voltage generated by your PV module. When choosing your solar panel, you will need to know the exact inverter you want to use before you drop some serious coin because the output voltage of your solar panel must not exceed the allowed input voltage of your inverter. If the electrical voltage is slightly higher even by a bit than the inverter allows, your inverter will most likely be damaged.
To illustrate this in greater detail, let's take a look at the specifications of the Hoymiles HM-1500 inverter. There are three crucial specifications for this inverter that you have to check against the specifications of your solar panel: the operating voltage range, the maximum input voltage, and the minimum voltage.

The minimum voltage indicates the amount of voltage that needs to be available for your inverter to begin operating. In the case of the HM-1500 inverter, this would be 16 V which is easily achievable. The maximum 60 V voltage of the inverter must not be exceeded by your solar module or the inverter might break down. It is here you will have to calculate the open-circuit voltage, i.e. the voltage that the PV module has when it "boots up". We will come back to this in greater detail in a moment.
Now, we will take a look at the operating voltage range. This indicates the optimal voltage range for the inverter. As you can see below, the 420 W panel from Trina delivers a voltage (VMPP) of 31.61 V at maximum power. This places the panel slightly below the ideal operating range of Hoymiles' HM-1500 inverter, which is between 36 V to 48 V. We will calculate how much power you lose with this.
Caution: Voltage depends on the temperature!
In the PV module specifications, you will find a so-called temperature coefficient. The temperature coefficient of a solar module is measured based on the change in the electrical output of the module in response to temperature changes. This is very important as temperature decreases, then the voltage of your panels will increase! As a result, the open-circuit voltage can be greater than specified in the specifications at typically between 20 °C to 25 °C, which will result in the potential destruction of your inverter. Make sure you leave enough buffer for the voltage of your panel.
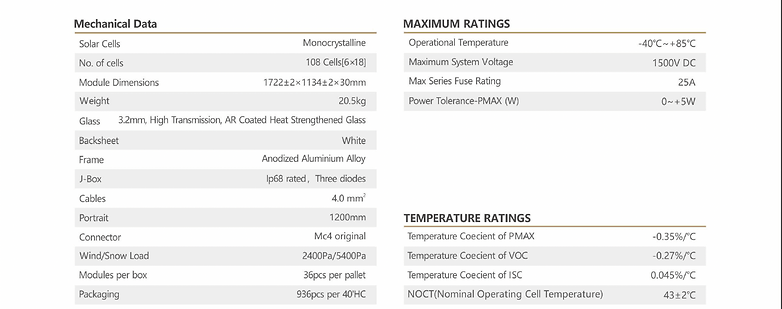
If you prefer to tread with caution, then assume a lowest temperature of -25 °C. The specification listed for the open circuit voltage of our panel would translate to a temperature difference of 50 °C. With the temperature coefficient of -0.27 %/°C, this results in a voltage difference of a whopping 13.5 V. In very extreme cold in winter, the Trina panel could theoretically achieve a voltage of 50.88 V. The HM-1500 with its maximum voltage of 60 V would be able to cope with that.
Ampere (A)
Ampere is the unit for electric current. Like voltage, amperage also depends on external influences. The more light that falls on the PV module, the higher the amperage increases, and thus, the power. The maximum current of the panel is listed in the specifications as the IMPP value.
Using the same panel, which is the 420 W module from Trina: At a maximum voltage of 31.61 V, the current stands at 13.29 A—if you were to multiply both values together, you get the maximum power of 420.0969 watts. However, the Hoymiles HM-1500 has a maximum current consumption of 11.5 A—and the inverter does not accept anything higher than that. If it does not exceed the current, everything will operate normally, but you will "lose" a little power. So at 31.61 V times 11.5 A, the panel would deliver 364 W.
The Hoymiles HM-1500 has four so-called MPPT inputs, and each of them can accept 11.5 A. Hence under optimal conditions, four times 364 W is possible, for a total of 1,454 W. This means you would not use the maximum 1,500 W inverter to its full capacity. On the other hand, you would have to throttle this inverter down to 600 W anyway to have it work with a wall socket.
Cell types at a glance
Another aspect of PV modules is the different cell types. With bifacial modules, full-cell and half-cell modules, there are numerous panels that differ from each other structurally and operationally.
There are also differences in the solar cells within the modules: monocrystalline solar cells have higher efficiency and are generally more expensive than polycrystalline cells. Polycrystalline solar cells have a lower efficiency but are cheaper. This means that you need more surface area for the same output in panels with polycrystalline cells.
Full cells and half cells
There is another difference in the cell structure, namely full-cell modules and half-cells. Here, too, there's a difference in efficiency. Most PV modules currently sold rely on half-cells, offering about 2% to 4% more power per area than full-cell modules.
Bifacial Cells
Finally, there are bifacial solar modules, which can generate solar power on both sides, allowing the module to capture light that passes by the panel and reflect it to the back portion. However, the back portion of the bifacial modules does not have the same power rating as the front. The special design is also more expensive, which means you have to dig a little deeper into your pockets to pick one up. Bifacial modules are useful as solar fences, for instance. When mounted flat on the garage roof, bifacial modules do not make much sense.
Series connection vs. parallel connection
Finally, it is important to clarify how you will wire your PV modules. You have two options when wiring your solar panels: You connect the panels in series or in parallel.
Series connection: Voltage is added
With a series connection, you connect solar panels in a chain. You connect the positive pole of one panel to the negative pole of the next. The voltages are then added up. Two panels at 35 V each will eventually result in a voltage of 70 V.
Parallel connection: Current is added
With a parallel connection, you connect all positive poles of the panels to each other and all negative poles to each other. The voltage remains the same, but the current is added. Two panels connected in parallel at 6 A each will have a current of 12 A.
Instead of a pure parallel or series connection, you can also connect your modules using a combination of both configurations on one roof. For instance, if you have four panels, you can connect two in series and have these two series connected parallelly.
With the typical PV modules in the 400 W class and classic microinverters for balcony power plants, a series or parallel connection does not make much sense, as the individual MPPT trackers here have already been manufactured in such a size to fit PV modules.
What are the warranties on PV modules?
Last but not least, warranty is an important factor. To put it more accurately, warranties. This is because when it comes to PV modules, you typically have a product warranty and a performance warranty. The product warranty is the classic warranty that you all are familiar with when purchasing a product. Defects attributed to the manufacturer are covered by the product warranty. Do take note that warranty periods vary between panels and manufacturers. In the case of our example, the 420W panel from Trina, you have a 25-year product warranty.
The other warranty that accompanies PV modules is the performance warranty. With the performance guarantee, manufacturers specify the minimum remaining power based on the original power of their solar panels after a certain period of time. There are also differences between panels when it comes to the performance guarantee. Trina's 420 W panel, for example, still guarantees a whopping 84.8% of the original power after 25 years.
- Also interesting: How to calculate when a balcony power plant is worthwhile.
Q&A - Questions and answers
How big can solar panels be?
In the US, local governments require a homeowner to obtain a permit for rooftop panels prior to installation. Once the PV system is installed, the local government will send a professional to inspect the new array and make sure that all the relevant safety codes have been followed. Do consult your local government to know what is the maximum size permitted.
How much does a solar panel weigh?
Typical rigid 2-m2 glass solar panels with an output of about 380 to 450 Wp weigh about 20 to 22 kg. Foldable panels or plastic modules are significantly lighter.
How long does a solar panel last?
Generally, manufacturers will give you a 15- to 20-year product warranty and a 25- to 30-year performance warranty.
How expensive are solar panels?
The prices for PV modules have fallen sharply in recent months. Modules in the 400 W class can be found for as little as $100.
What is the ideal inclination for a solar panel?
An angle of inclination of 30 to 35 degrees is ideal during installation. For more information about inverters and the installation of PV modules, I recommend our big balcony power plant guide.
Do you have any questions about PV modules or are you experienced in this matter and would like to share your thoughts? Feel free to write it in the comments.
