Apple HomePod: How To Use Temperature and Humidity Sensors
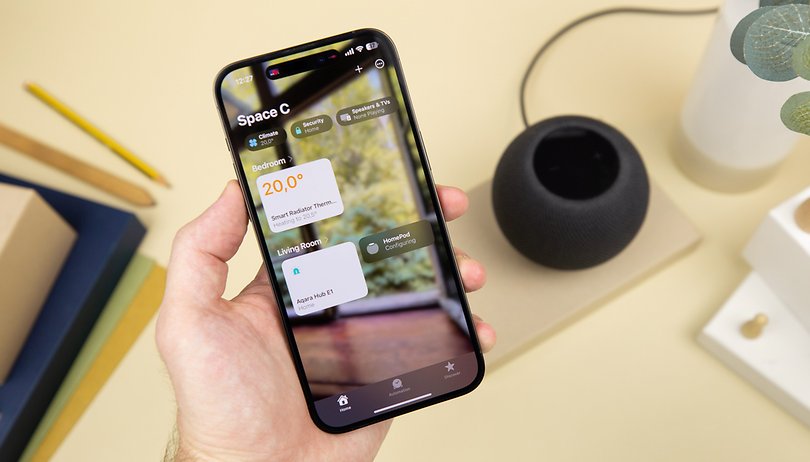

The HomePod 2023 has a new sensor to detect room temperature and humidity levels. Similarly, the smaller HomePod Mini speaker comes with the same capability. In this guide, NextPit tell's you how to use and set up the temperature and humidity sensing on Apple's smart speakers to smarten your home.
Through the built-in sensor on the Apple HomePod 2 and HomePod Mini, users can take advantage of extensive smart home automations or simply when reading a room's temperature and humidity. There are several ways to do this, which include summoning Siri assistant or doing it via the Home app on the iPhone or iPad.
However, Apple says the HomePod 2 or Mini works well in tracking temperature in the range of 59ºF to 86ºF (15ºC to 30ºC). In terms of humidity, the smart speakers are optimized to read levels between 30 and 70%. The company also notes that using the speaker for a long duration could result in an increase in temperature, consequently affecting the ambient readings.
What you'll need to enable the temperature and humidity sensor on HomePod
If you're enabling the temperature and humidity sensor on the HomePod Mini 2, the speaker should at least be updated to HomePod OS 16.3. This can be done on the Home app of iPhone or iPad. At the same time, the iPhone or iPad should be running on the latest iOS 16 and iPadOS 16 version, respectively.
- Go to the Home app.
- Tap the three-dot icon on top to open Settings.
- Select Home Settings.
- Check if there are any updates available for the HomePod Mini 2.
- Tap update to install the latest HomePod OS.
For the HomePod 2023, the feature comes available out-of-the-box and won't require any software updates. Below are the easy steps on how to check temperature and humidity levels as well setting up a smart scene or automation.
- Don't miss: Which is the best Apple HomePod to buy in 2023?
How to check temperature and humidity readings via iPhone or iPad
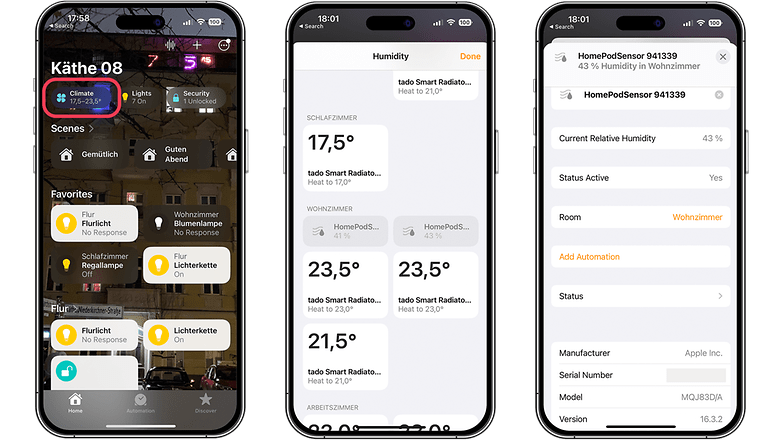
The most common way to check temperature and humidity readings is using your iPhone or iPad. Of course, you'll need to connect your HomePod speaker to your smart home network first before it can start monitoring the room where it is located. Once done, just proceed to the step-by-step guide below.
- Open the Home app on your iPhone or iPad.
- Tap Climate at the top options.
- You will see a Temperature or Humidity option along with a preview of each reading.
- Tapping further, you will be presented with the current smart devices—including your HomePod 2 or Mini.
- Alternatively, the readings are displayed on top of the created room where the HomePod is located.
How to check temperature or humidity reading via Siri
If you're in the room where the speaker is located, you can use the Siri voice command to check the temperature or humidity sensor. For example, you can say "Hey Siri, what's the temperature (humidity) in this room?". For multiroom speaker setup, an option is to ask Siri the readings of a specific room.
How to use the temperature or humidity sensing for smart scenes and automations
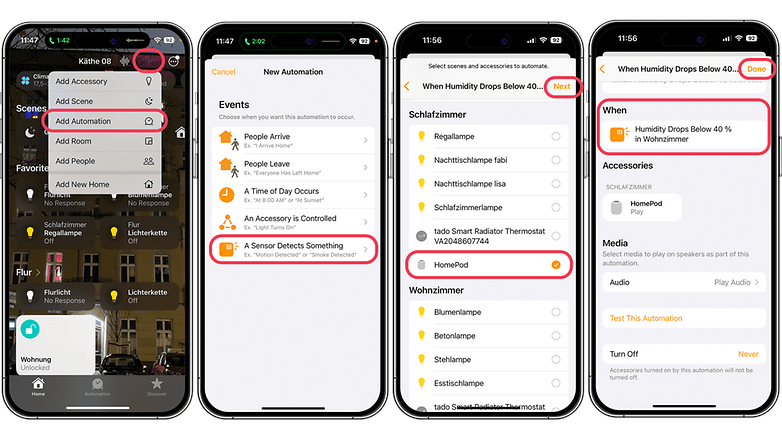
Like with other smart thermostats or Matter-enabled accessories, you can use the temperature or humidity sensing of your HomePod to trigger a scene. Users are allowed to set a temperature level and certain time of the day on when the pre-program automation will kick in.
- Open the Home app.
- Tap the (+) icon on top.
- Choose Add Automation.
- Select A Sensor Detects Something.
- Pick the preferred HomePod temperature or humidity sensor and tap Next.
- Set a specific time of the day or period on when the automation will be activated.
- Alternatively, you can opt to start automation using the occupancy status.
- Pick the action or scene you want to trigger.
- Tap Next and Done.
Share your thoughts with us in the comments section! Do you use an Apple HomePod speaker at home? If so, we'd love to hear about your favorite smart home features and any additional tips you have for making your home smarter.
