Editing Photos with Galaxy AI: How it Works on Samsung Phones


With Galaxy AI, Samsung also bestowed compatible Galaxy smartphones with some new photo tricks you can use to modify and enhance your photos. In this article, you can find out how to get more out of your photos with your Galaxy smartphone thanks to AI.
When Samsung unveiled its Galaxy S24 series (read comparison), the AI platform Galaxy AI was the main star of the show. Long before Apple introduced Apple Intelligence, Samsung was already showing off a whole host of AI features on selected Samsung phones that are ready for action. Thanks to Circle to Search, for instance, you can search for objects quickly or have text translated at lightning speed.
- We also took a look at all of Samsung's other AI features: In the in-depth Samsung Galaxy AI review
However, you can also edit photos thanks to these AI capabilities which we will talk about in this article. Learn how to make objects disappear, reposition them, or adjust their size. We'll also show you how to straighten crooked photos without cropping the edges. You can also get rid of reflections thanks to Galaxy AI. That's a lot of stuff, so let's not waste any time!
How to remove objects from photos using Galaxy AI
We're pretty much all familiar with Google's Magic Eraser by now, right? Samsung has also mastered the trick of removing annoying objects from photos now. Similar to the Magic Eraser, the procedure is equally as simple.
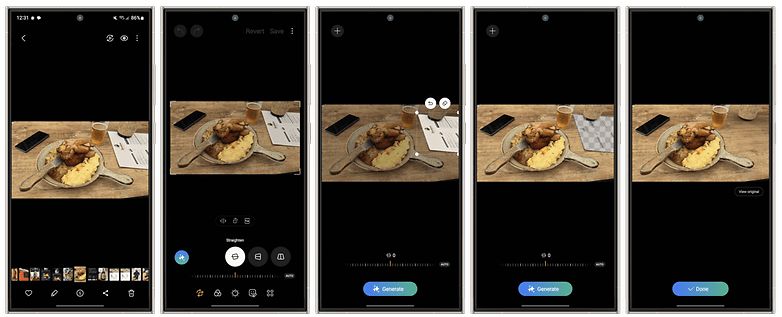
This is how it works:
- Open the Gallery app and select a photo.
- Tap the edit icon (the pencil at the bottom) to switch to edit mode.
- Tap the stars icon on the left for generative editing.
- Tap the desired object or select it by drawing a line around it.
- With a long press on the selected object, a delete symbol appears which you can then tap.
- Tap Generate at the bottom and the object will disappear as if by magic.
Move and resize objects in photos using Galaxy AI
It's just as easy to move selected objects to a different location, rotate them, and adjust their size. In the example below, I moved my beer and made sure it still retains the correct perspective at the same time:
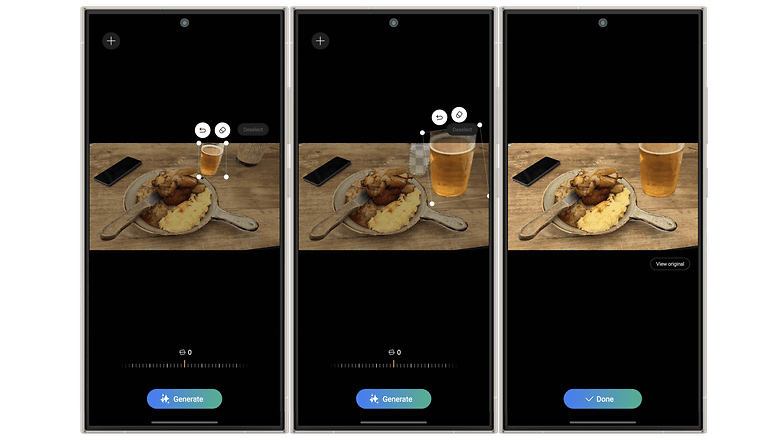
This is how it works:
- Repeat steps 1-4 from the first tip.
- Hold down the object for a long time.
- Move the desired object to the target location in the image.
- You can now rotate and resize it there.
Align photos correctly using Galaxy AI
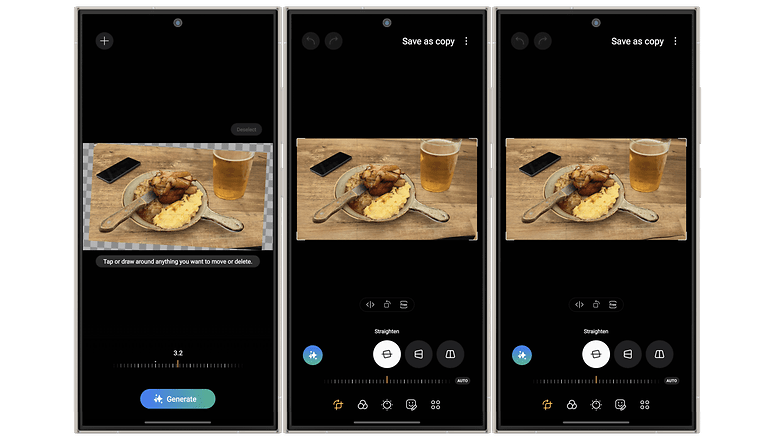
You can align photos on your Samsung smartphone using approximately a zillion different apps anyway if your subject looks a little crooked. In the example above, the plate with my pork knuckle was simply too crooked. Normally, the edges of the photos are cropped when aligned. However, if you were to sprinkle some Galaxy AI fairy dust over the image, the empty parts of the new image will be filled in by AI after alignment. This is how it works:
- Select a photo from the Gallery.
- Tap the Edit icon.
- Select the generative editing icon.
- Use the tilt function to align the photo accordingly.
- Select Generate.
- Select OK and save the photo as a copy.
Removing reflections from photos using Galaxy AI
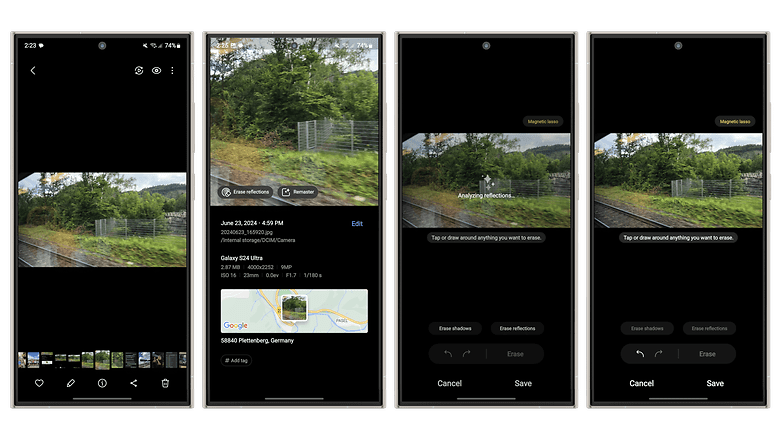
I have one last tip for you but it doesn't always work. You will need to have a clear reflection in the image for it to be recognized by the photo tool. Strangely enough, you can't remove reflections using the pencil icon for editing as in all the other examples. Rather, you will need to go through the info icon, which is where you can find the option to remove the reflection. This is how it works:
- Select a photo from the gallery.
- Tap on the info icon at the bottom center.
- If a reflection is detected, you will see the Erase reflection button to the left of the Optimize option - select it.
- Finally, tap Save at the bottom right.
That's it for today and I sincerely hope that all of you will become true photo-editing kings and queens with these tips. Let us know in the comments what you think about these functions and which photo editing features do you still urgently wish for.


