How to use Instagram on your Mac


Instagram, the popular social media app that lets you edit photos and videos to share with your friends and family, is primarily designed to be used on a mobile device, but some of us still prefer the desktop experience. Instagram for Windows exists, but for Apple users, its not so simple. In this article we'll show you how to use Instagram on your Mac.
There are several workarounds that let you access Instagram on your Macbook or iMac, and we'll detail them all here, but we start with the most comprehensive experience, which—brace yourself—involves emulating good old Android on your Apple device. But trust us, it'll be worth it for those likes.
Jump to:
How to use an emulator to get Instagram on your Mac
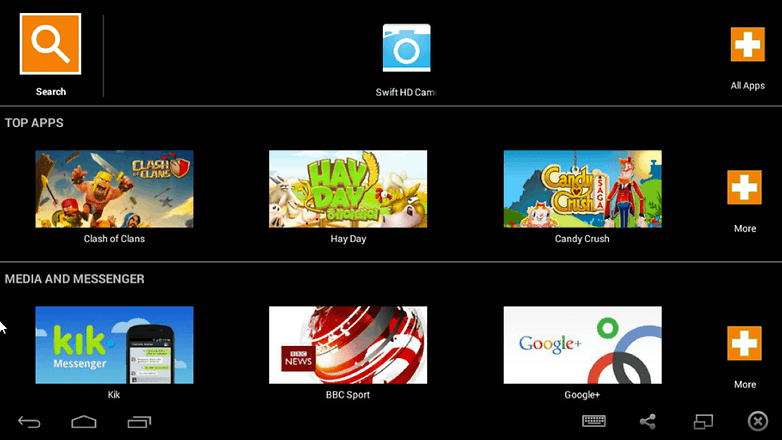
Instagram wants to run on your mobile device, but you can work around this by emulating Google's mobile OS Android on your desktop. There are a few popular Android emulators available, but we recommend BlueStacks, one of the more reliable options which works on both Windows and MacOS.
- First, head to the BlueStacks website, download the application, and follow the installation instructions.
- Naturally, you'll need a Google account. Log in with your existing Google account details or create a new one.
- Type “Instagram” in the in BlueStacks search to find the app in the Google Play Store. Then download and install it.
When trying to install Instagram through BlueStacks, you may get stuck on an "Error: Package file is invalid" message. To resolve this, close BlueStacks and download the file recommended on this support page. Afterward, download Instagram and launch the app.
Once you can launch the app, simply log in with your normal Instagram credentials or create a new account. This method should bring full app functionality to your desktop: browse posts, upload or edit photos and videos, message, etc. just as you would on a smartphone.

If your computer has a webcam integrated or attached, Instagram’s camera function works normally for taking selfies. If you want to upload pictures from a camera or a different source, however, you will need to transfer those files from your Mac's hard drive to BlueStacks. That's a bit more tricky.

Upload photos from your Mac to Instagram
Once again we have to turn to the Play Store via BlueStacks and install a file explorer app to handle the process. If you don't have a favorite Android file manager already, we recommend one from our best list.
The file manager app will allow you to explore your Mac's hard drive and find your pictures there. The path will be something like Windows/SD card/Pictures, which is admittedly a bit nonsensical.
Use Instagram on your Mac via a third party app
Instagram doesn't support any third party apps on MacOS. In fact, if anything, it actively works against them. As such, you may encounter more technical difficulties compared to using an emulator. Nonetheless, it may be worth trying if you don't enjoy the user experience of emulating Android.
The most popular app solution for MacOS is Flume, which is not available on the Mac App store for reasons outlined here. Nonetheless, Flume's stylish presentation and clean UI has kept a fanbase loyal.
Flume displays your Instagram feed as a stream of pictures, which you can click on to bring up options to caption, comment, like, etc.
How to access Instagram using Safari
Using your web browser, you can access your Instagram account at www.instagram.com.
However, you can't upload photos or videos to your account from the site. At least, you can't without a little creative tinkering in Safari. Here's how to bypass this restriction using a method known as User Agent Spoofing.
- Open Safari and head to Preferences > Advanced and make sure Show Develop Menu in Menu Bar is toggled on.
- Visit the Instagram website and log in to your account.
- Then select Develop > User Agent > Safari - iOS 11 - iPhone.
- The Instagram website should automatically reload (manually refresh if not) and display the mobile version of the site instead.
- Select the Camera icon, browse for the image you want to post and select Choose.
- You should see a preview of the image with basic editing options (rotate, choice between 16:9 or square aspect ratio).
- Tinker as you wish, then when you're ready, select Next, add your caption and share it with your Instagram followers.
This technique only permits the upload of images and not videos, and as described above, you don't get the full range of editing options, but if you just want to get pictures on there, it's less hassle then installing new software.
Do you use Instagram on your Mac computer? What do you think of the above methods?


WAY off topic for the site. If this is your future direction, you'll lose me.