Stage Manager: How to Properly Multitask on Apple iPad Like a Pro

Read in other languages:
Stage Manager is Apple's new multitasking system, introduced on the iPad and Mac last year. The initial version for iPadOS came with limited features; however, these have been significantly enhanced with the release of iPadOS 17. In this guide, nextpit explains how to multitask effectively using Stage Manager.
What is Stage Manager on iPadOS?
Before Stage Manager, multitasking on the iPad and iPad Pro was quite basic. You could only use split screen or Slide Over to run two apps, with one app in each window. Freely resizing and repositioning windows was restricted.
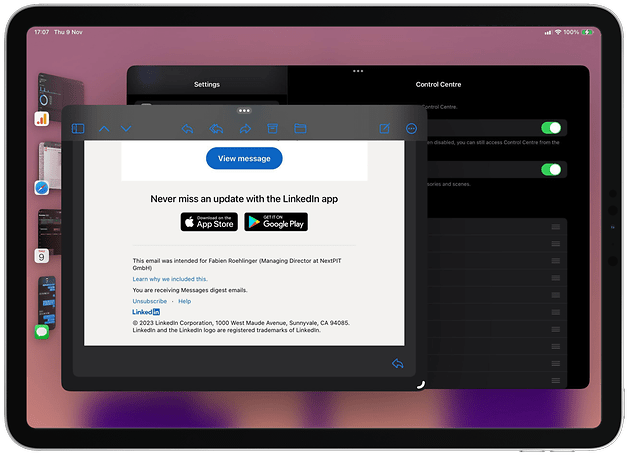
With the new Stage Manager, Apple has made it possible to open multiple apps simultaneously and group up to four of them on a screen called a stage. It also allows you to arrange apps anywhere on the screen and individually resize windows according to the preselected orientations and sizes they support. You can even expand an app to full screen while on a stage.
Apple has further enhanced Stage Manager in iPadOS 17, making it much closer to a Mac desktop or Windows OS experience. Now, while on a stage, you can resize and position most windows more freely or overlap them as you like.
How to activate Stage Manager
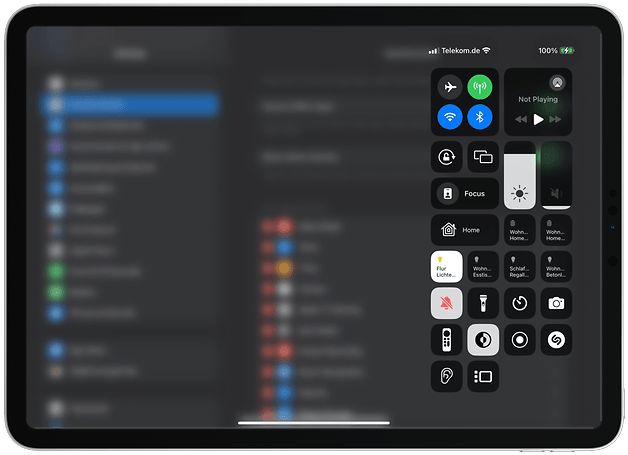
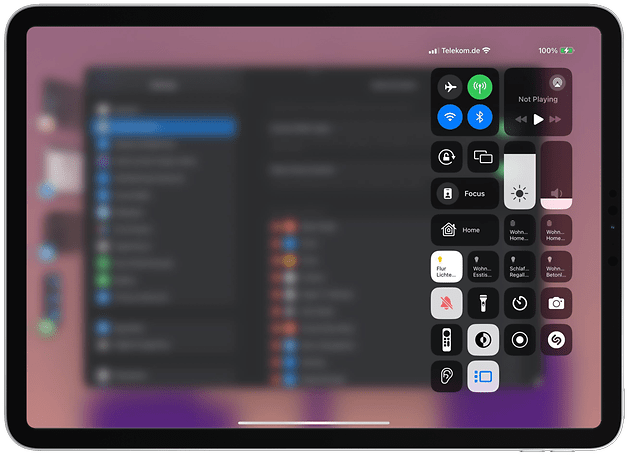
Before you can use Stage Manager, you need to enable it manually from the Control Center. Here is a step-by-step guide on how to turn Stage Manager on or off on supported iPad models:
- Open the Control Center by swiping down from the top-right corner of your iPad or iPad Pro's screen.
- Tap the Stage Manager icon, which looks like a rectangle with three vertical dots.
- A pop-up message will display “Stage Manager on” if you have activated it.
- Similarly, it will show “Stage Manager off” after you have disabled it.
- Alternatively, you can long-press the icon to open more options and choose to hide or show recent apps and the app dock.
If you activate Stage Manager while in an app, that app will be converted into a window. You can then add more windows or switch between stages.
How to use Stage Manager: Add, remove, and resize windows
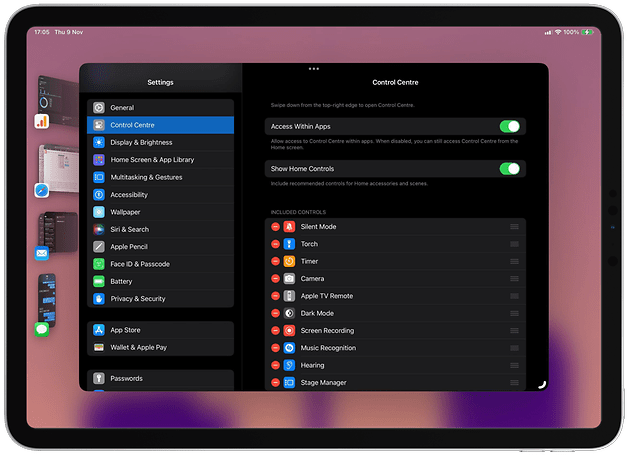
Once Stage Manager is enabled, it switches to a new layout with five stages. Four are positioned on the left as a vertical menu, while the fifth, or current stage, occupies the center. There's also an app dock at the bottom.
Again, the dock and recent apps can be hidden or displayed by long-pressing the Stage Manager icon from the Control Center. If hidden, you can swipe up from the bottom of the screen to show the dock and swipe from the left to display recent apps.
Adding or removing apps
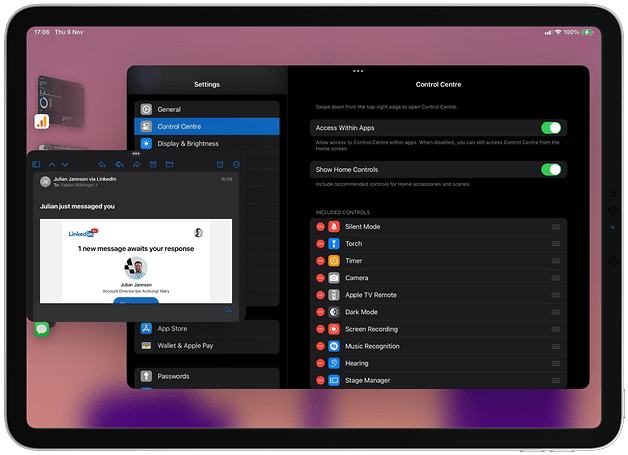
You can customize each stage by adding up to four apps, which are turned into windows once added. Here's how to add or remove an app on each stage:
- Select the stage you want to personalize.
- Drag an app from the dock or recent apps.
- Alternatively, you can add an app by selecting “Add Another Window” from the top menu of an app.
- To close or remove an app, tap the three-dot icon at the top of an app and select the 'X' button from the menu to close.
Remember that if a stage already has four apps running, and you try to add a new app or window to it, one of the existing apps will be closed automatically. Apple has not specified the criteria for which app is removed, but it likely depends on activity level, with the most inactive one being closed.
Resizing and repositioning a window
In iPadOS 17, the method for resizing a window remains the same: by tapping and holding the grab handle that appears at the bottom corner of the window. You can freely resize most apps, but there is a minimum and maximum size constraint. Follow the process below to resize a window:
- Tap and hold the grab handle that appears in one of the window's corners.
- Drag it to manually adjust the window to the size you prefer.
- You can also minimize or maximize a window via the three-dot menu at the top of the window.
What are the Stage Manager limitations?
While Stage Manager has become more flexible with iPadOS 17, it still has some limitations that need improvement. For instance, you cannot use or pin the same app across different stages. If you open an app in a selected stage, it will close in any other stage where it was open.
It's also not possible to select an app from your entire app library directly; you'll need to choose from the apps pinned on the dock or those available from the app switcher.
Despite these limitations, Stage Manager can be quite useful for multitasking on the iPad or iPad Pro, especially if you plan to open multiple apps at once.
Which Apple iPads are compatible with Stage Manager?
Many iPad Pro models support Stage Manager, but full functionality is only available on models equipped with Apple's custom M-series processor.
For instance, older iPad tablets with Bionic chipsets are limited to mirroring the display when connected to an external monitor. In contrast, the more recent iPad Pro models with M-series chipsets can extend their display to an external monitor and run up to eight apps simultaneously—four on the tablet and four on the monitor.
The following iPad Pro models are compatible with Stage Manager:
- Apple iPad Pro 11-inch (1st generation, 2018)
- Apple iPad Pro 12.9-inch (3rd generation, 2018)
- Apple iPad Pro 11-inch (2nd generation, 2020)
- Apple iPad Pro 12.9-inch (4th generation, 2020)
For models that support external monitor connections and window movement, each display can have a unique set of stages, and you can drag apps between the two screens. Currently, these are the iPad models with those capabilities:
- Apple iPad Pro 11-inch (3rd generation, 2021)
- Apple iPad Pro 12.9-inch (5th generation, 2021)
- Apple iPad Air (5th generation, 2022)
- Apple iPad Pro 11-inch (4th generation, 2022)
- Apple iPad Pro 12.9-inch (6th generation, 2022)
Have you used Stage Manager before? How do you think Apple could improve it? Are there specific features you'd like to see added? Share your thoughts in the comments.
